
3D reconstruction with Photogrammetry
Session 7: Photogrammetry
Downloads
-
In this tutorial we will be using the software Metashape by Agisoft. Download the Standard edition from the Agisoft site and sign up for a free 30-day trial.
-
Sample images and project files - download this folder.
About this tutorial
For our tutorial, I baked and photographed a loaf of sourdough bread. Since the start of the pandemic, many people have been baking bread in their homes. With this increased demand, flour and yeast have been in short supply and bread is trending in Google searches. The results of what we create here could accompany a recipe or an article reporting on this trend.
How to photograph your scene or object
When capturing for Photogrammetry, the aesthetic quality of the images is unimportant. Composition bears no significance and images are used to record data about the scene, object, human that we are capturing.
For the sample photo set I used my iPhone camera but using a camera with a larger sensor could give you a more detailed reconstruction.
If you have access to professional photography equipment, you can have a look at these guides: Unity Photogrammetry Workflow Ebook focused on creating game assets Creating Assets with Photogrammetry using a rotating surface Photogrammetry photography guide by the Online News Association
Whatever camera you are using, these rules are important:
- The entire subject should always be in focus
- Your subject should not move. If possible - nothing in the scene should move
- Keep the same camera settings for all photos, no change to the zoom level, shutter, ISO, no change of image format (vertical/horizontal)
- Capture as many images as possible, but consider that the more images the longer it could take to process. 70 photos per scan is a pretty standard number (but less will work)
- Even lighting - In a virtual environment, the object should be able to receive real-time lights and shadows, so when possible we should light the object evenly on all sides to achieve neutral lighting and avoid harsh shadows
- Measure a part of the scene or use an object for scale
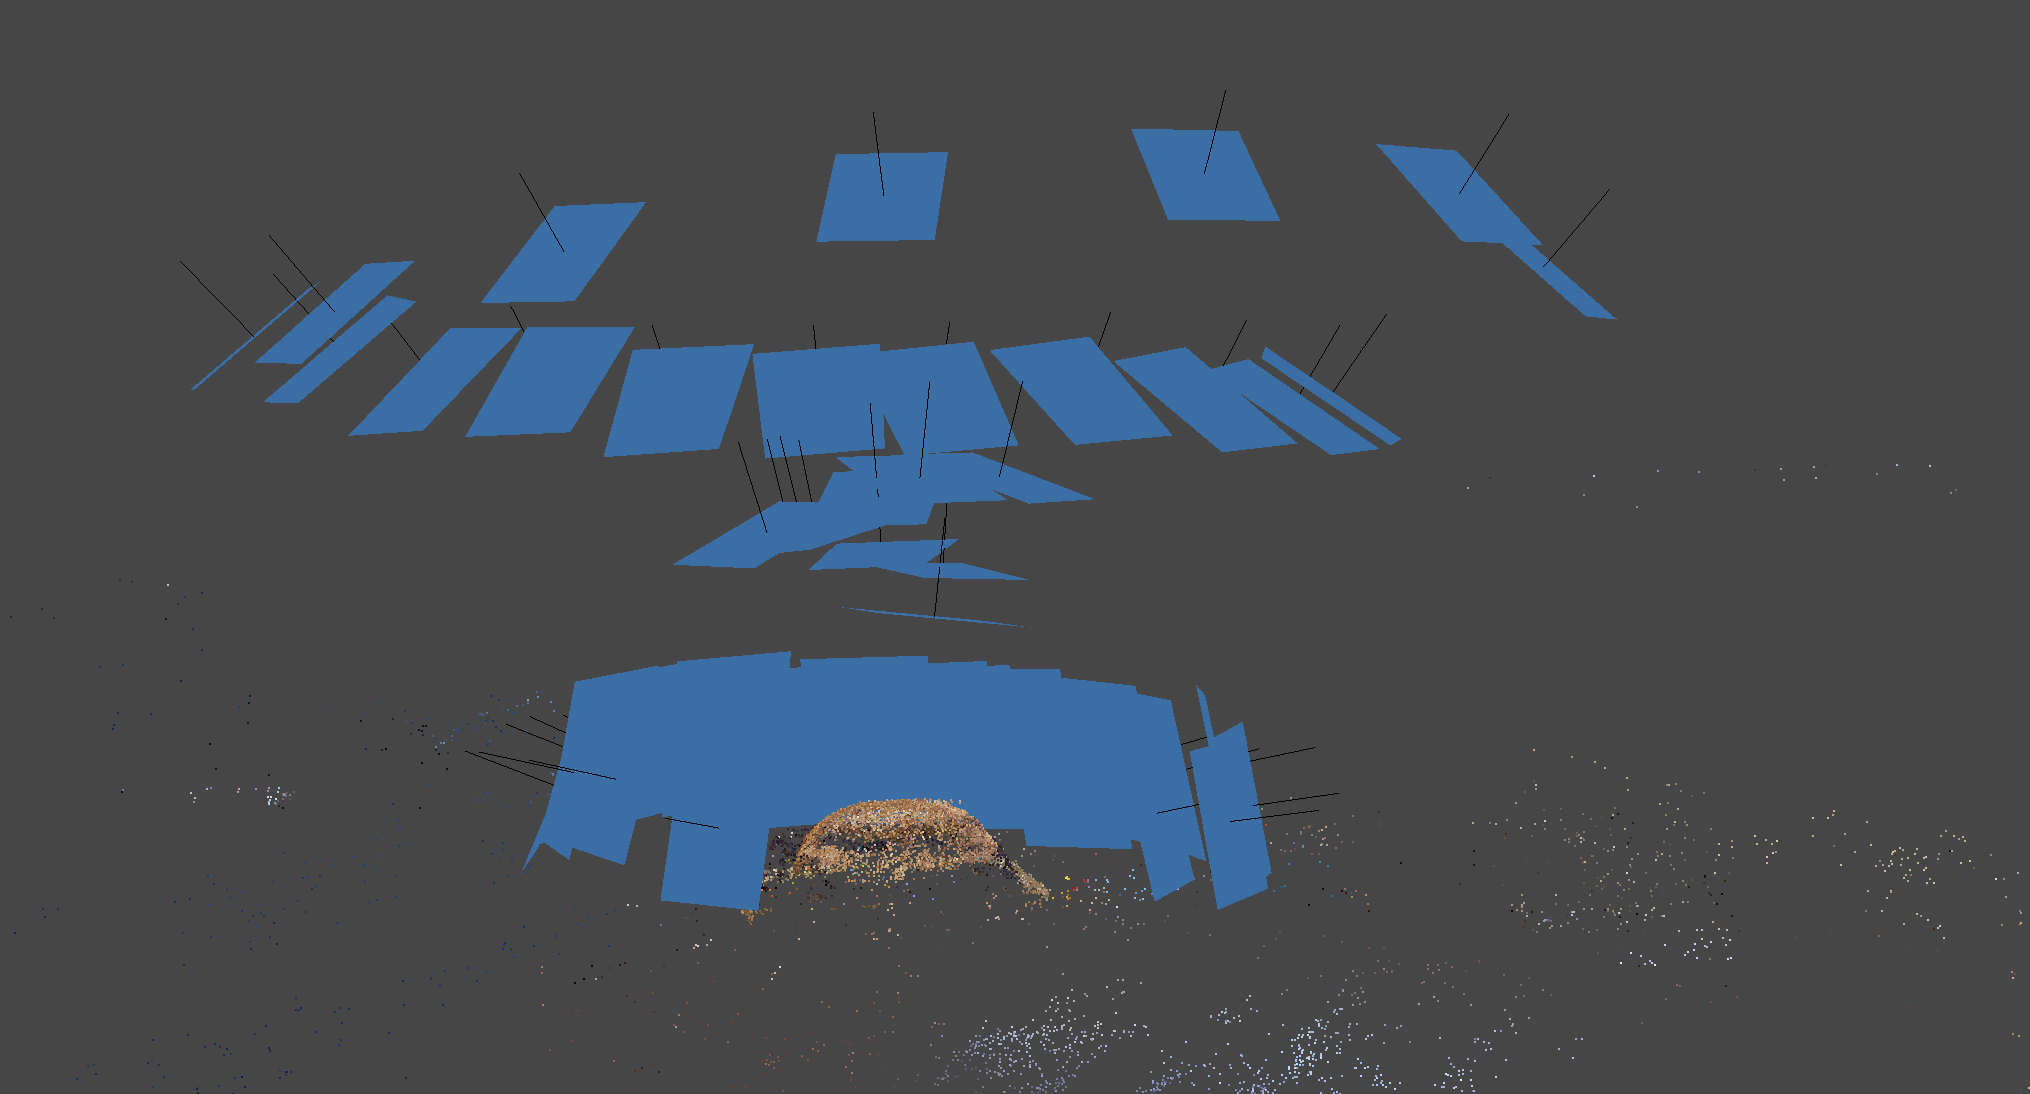
- Encircle the subject a few times, each time from a different angle - straight on, from below, from above. Get images of specific details from close up. Climb a ladder if needed for capturing the top angle. Make sure your photographs cover every part of the object. Below are diagrams that show the correct way to move while capturing different types of subjects and examples of image taking positions:
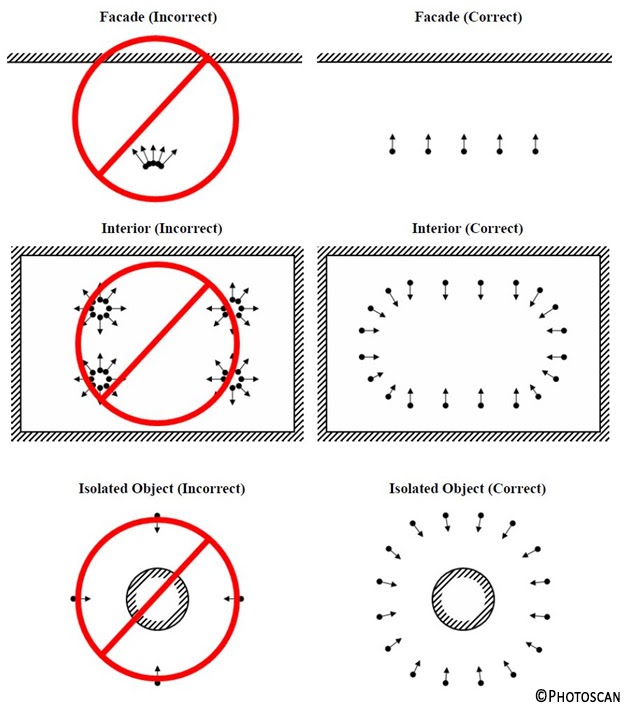
Your path around a subject should look like this:
Photogrammetry does not work well for all subjects. Here are the main pitfalls:
- Reflective objects confuse the software. Reflection can result in holes and occasionally reflected objects are interpreted as additional data points
- Small and fine details like hairs are hard for the software to reconstruct
- Lack of detail - areas too dark or overexposed in the image could result in holes
- Repeating features - the algorithms are looking for distinctly different features and their relationships.
If your object has repeating patterns or a lack of detail, you can use fiducial markers when photographing to help the software.
How To Process Your Capture
1. Import Photos
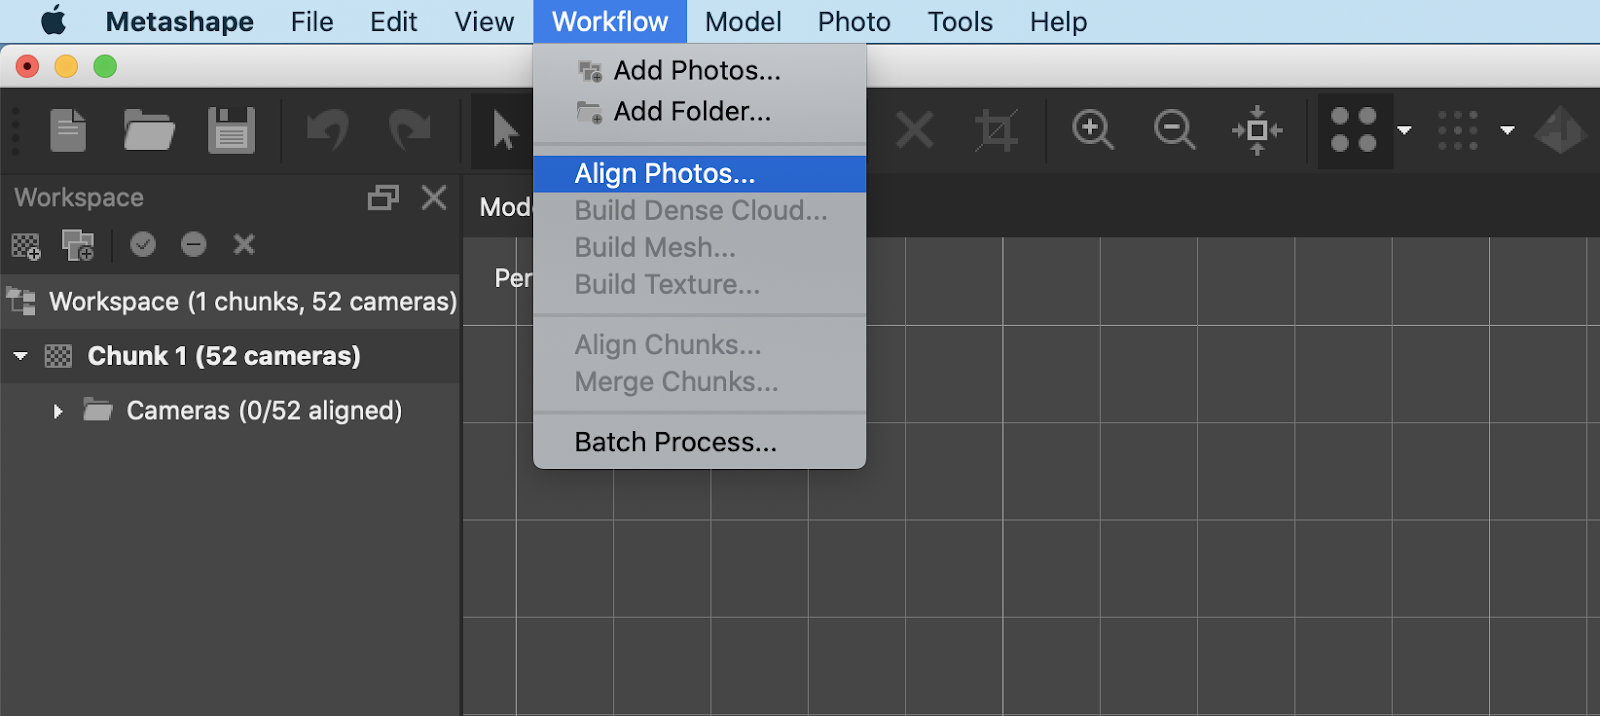
In Metashape, we first need to import the photos that we’ll be using for the reconstruction. You can do this from the top menu Workflow -> Add Photos or from the Workspace tab by clicking the Add Photo icon or simply dragging and dropping images into the tab.

Select all the photos and click Open.
2. Align Photos/ Build Sparse Cloud
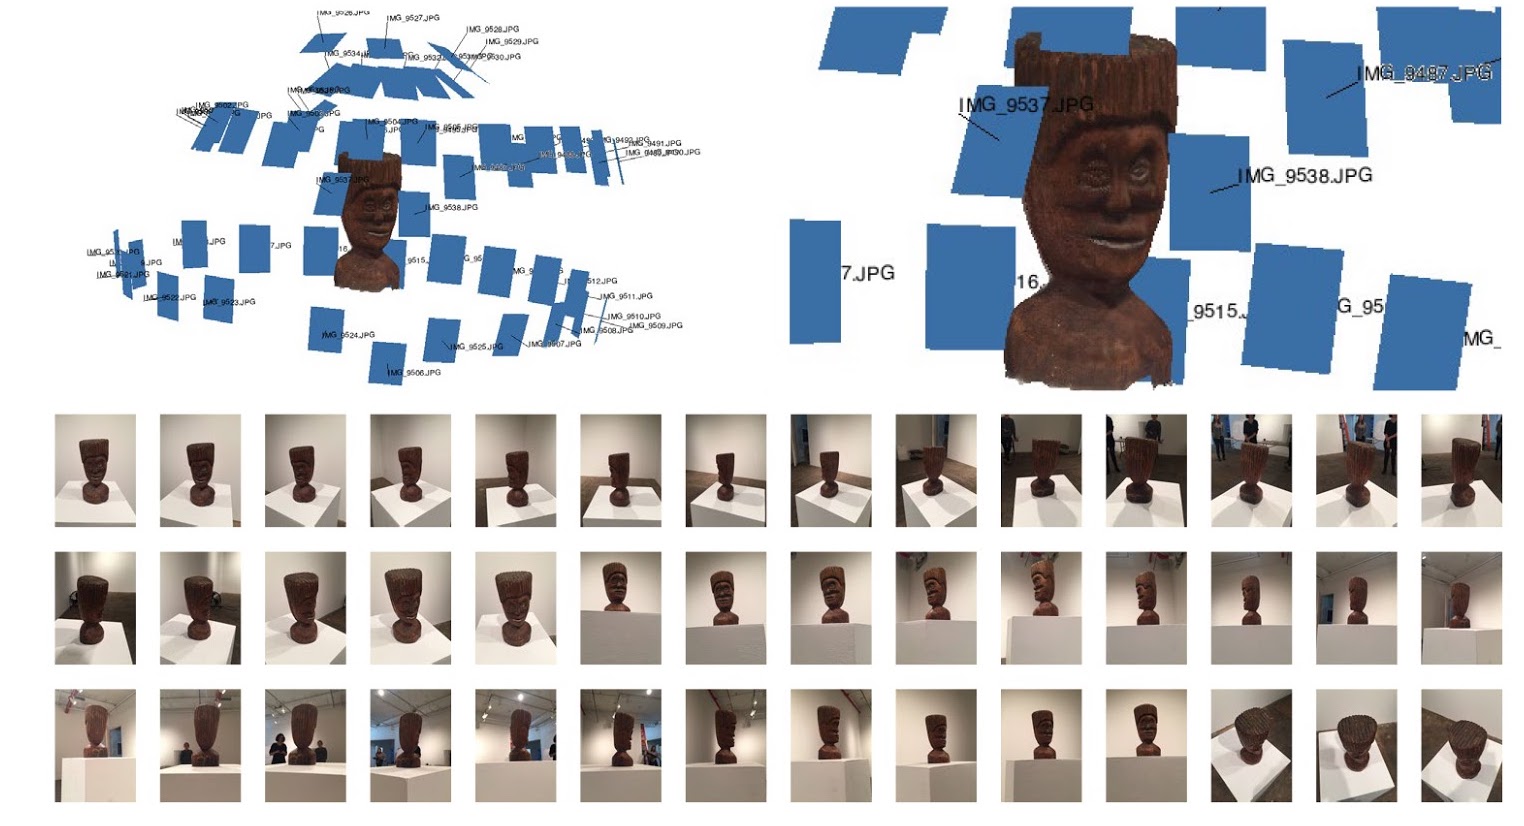
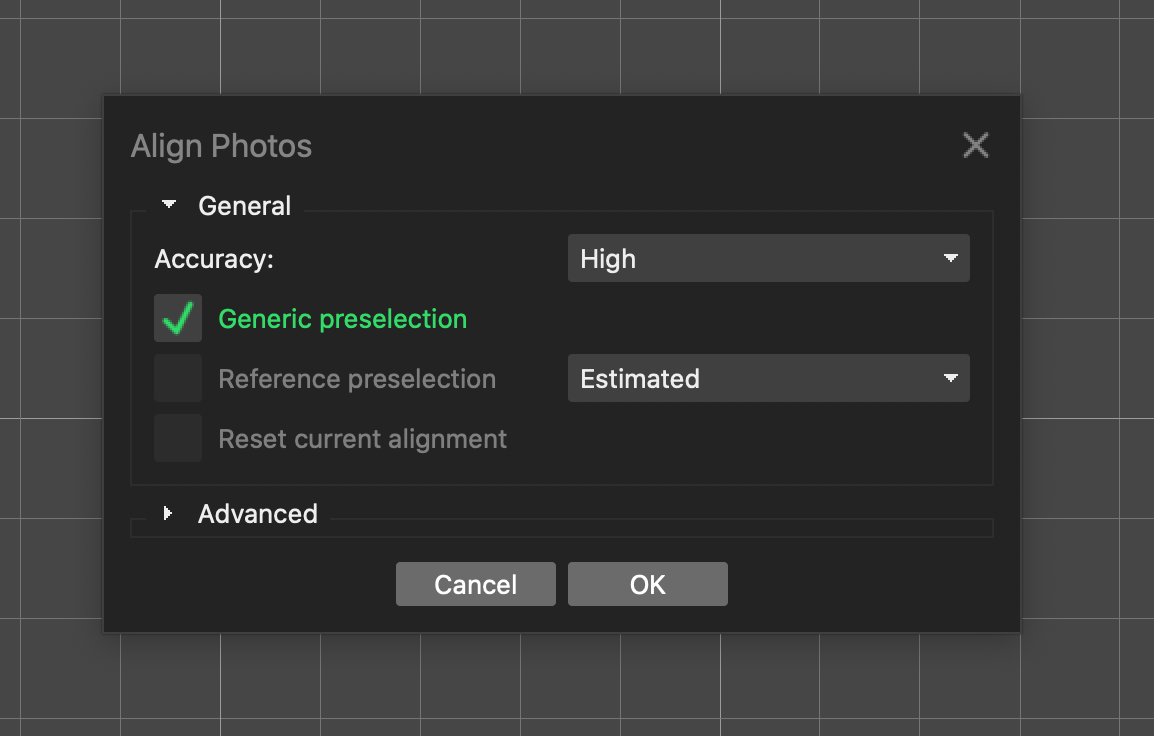
We now have a chunk with an x amount of photos (51 in our case). The first step in the reconstruction process is alignment. In the top menu, go to Workflow -> Align Photos.
We will leave these menu options as they are.
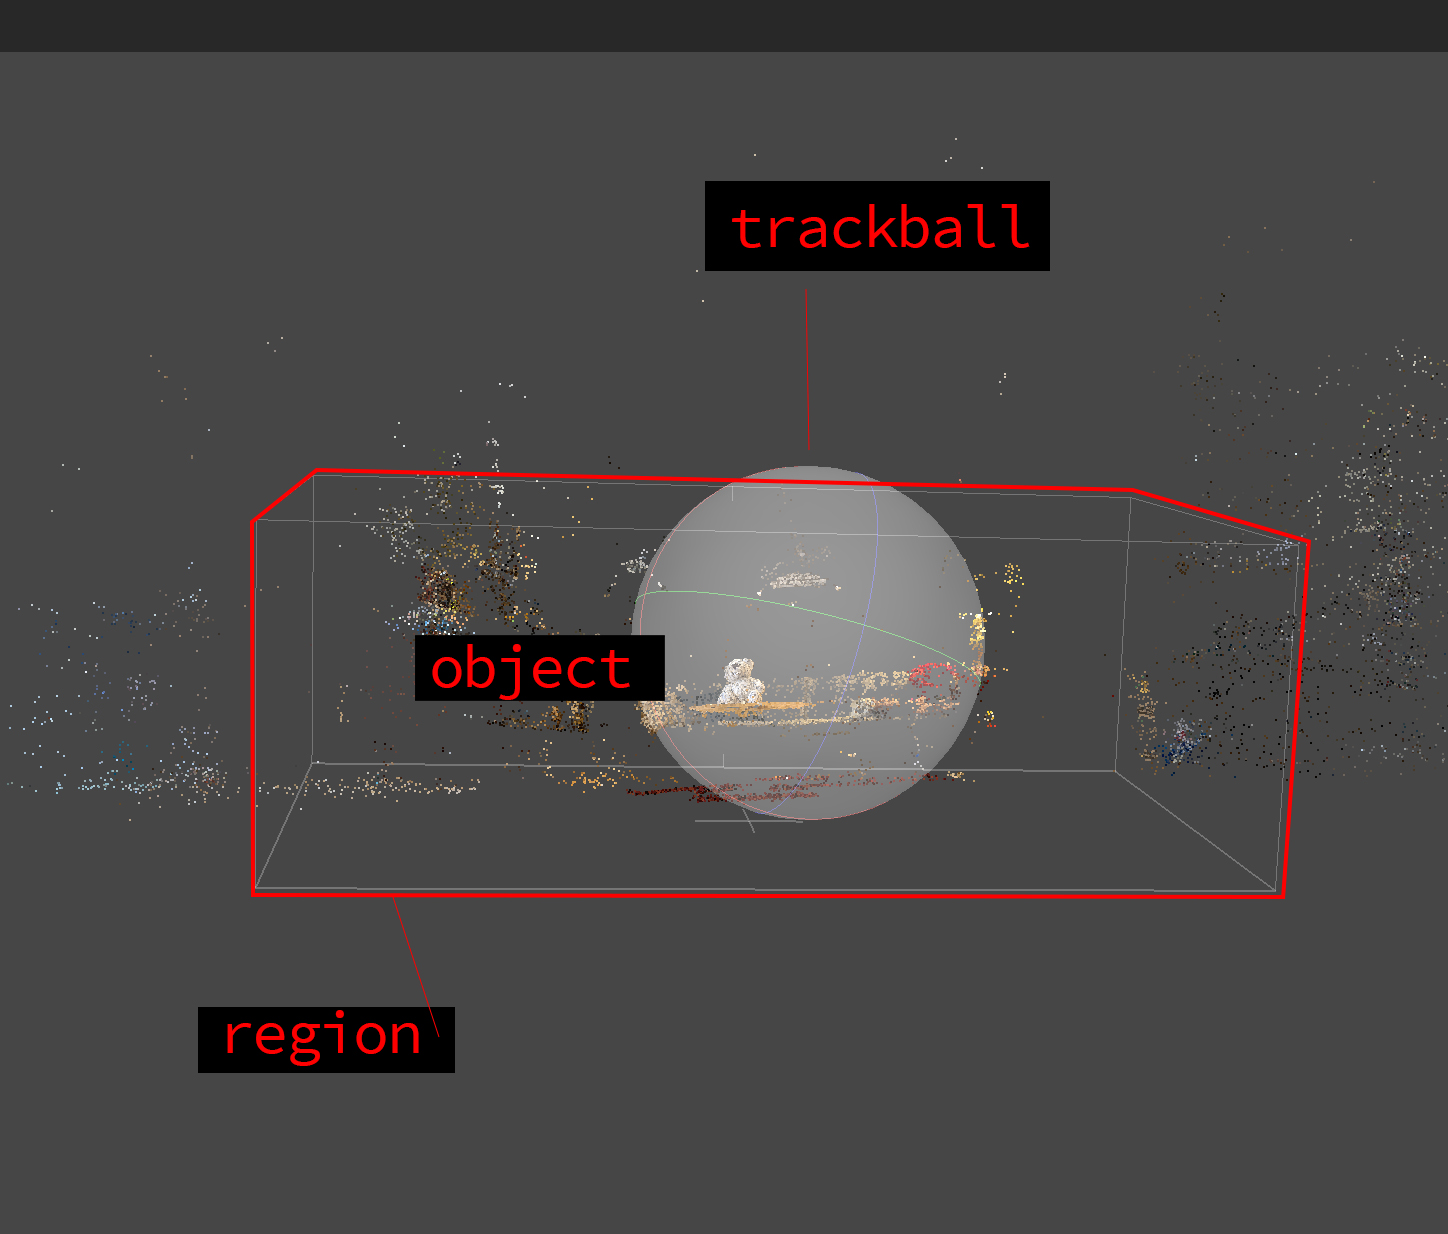
We now have a sparse point cloud. In the Workspace tab, you’ll see how many photos in your chunk were used for the alignment. Ideally, all the photos you uploaded were able to be aligned by the software. You can scroll and drag using your trackpad or mouse to zoom and orbit around the scene. The trackball represents the center of our object.
In Model -> Show/Hide Items you can toggle the visibility of different information. For example, you can see the position in which all the images were taken by toggling Show Cameras.
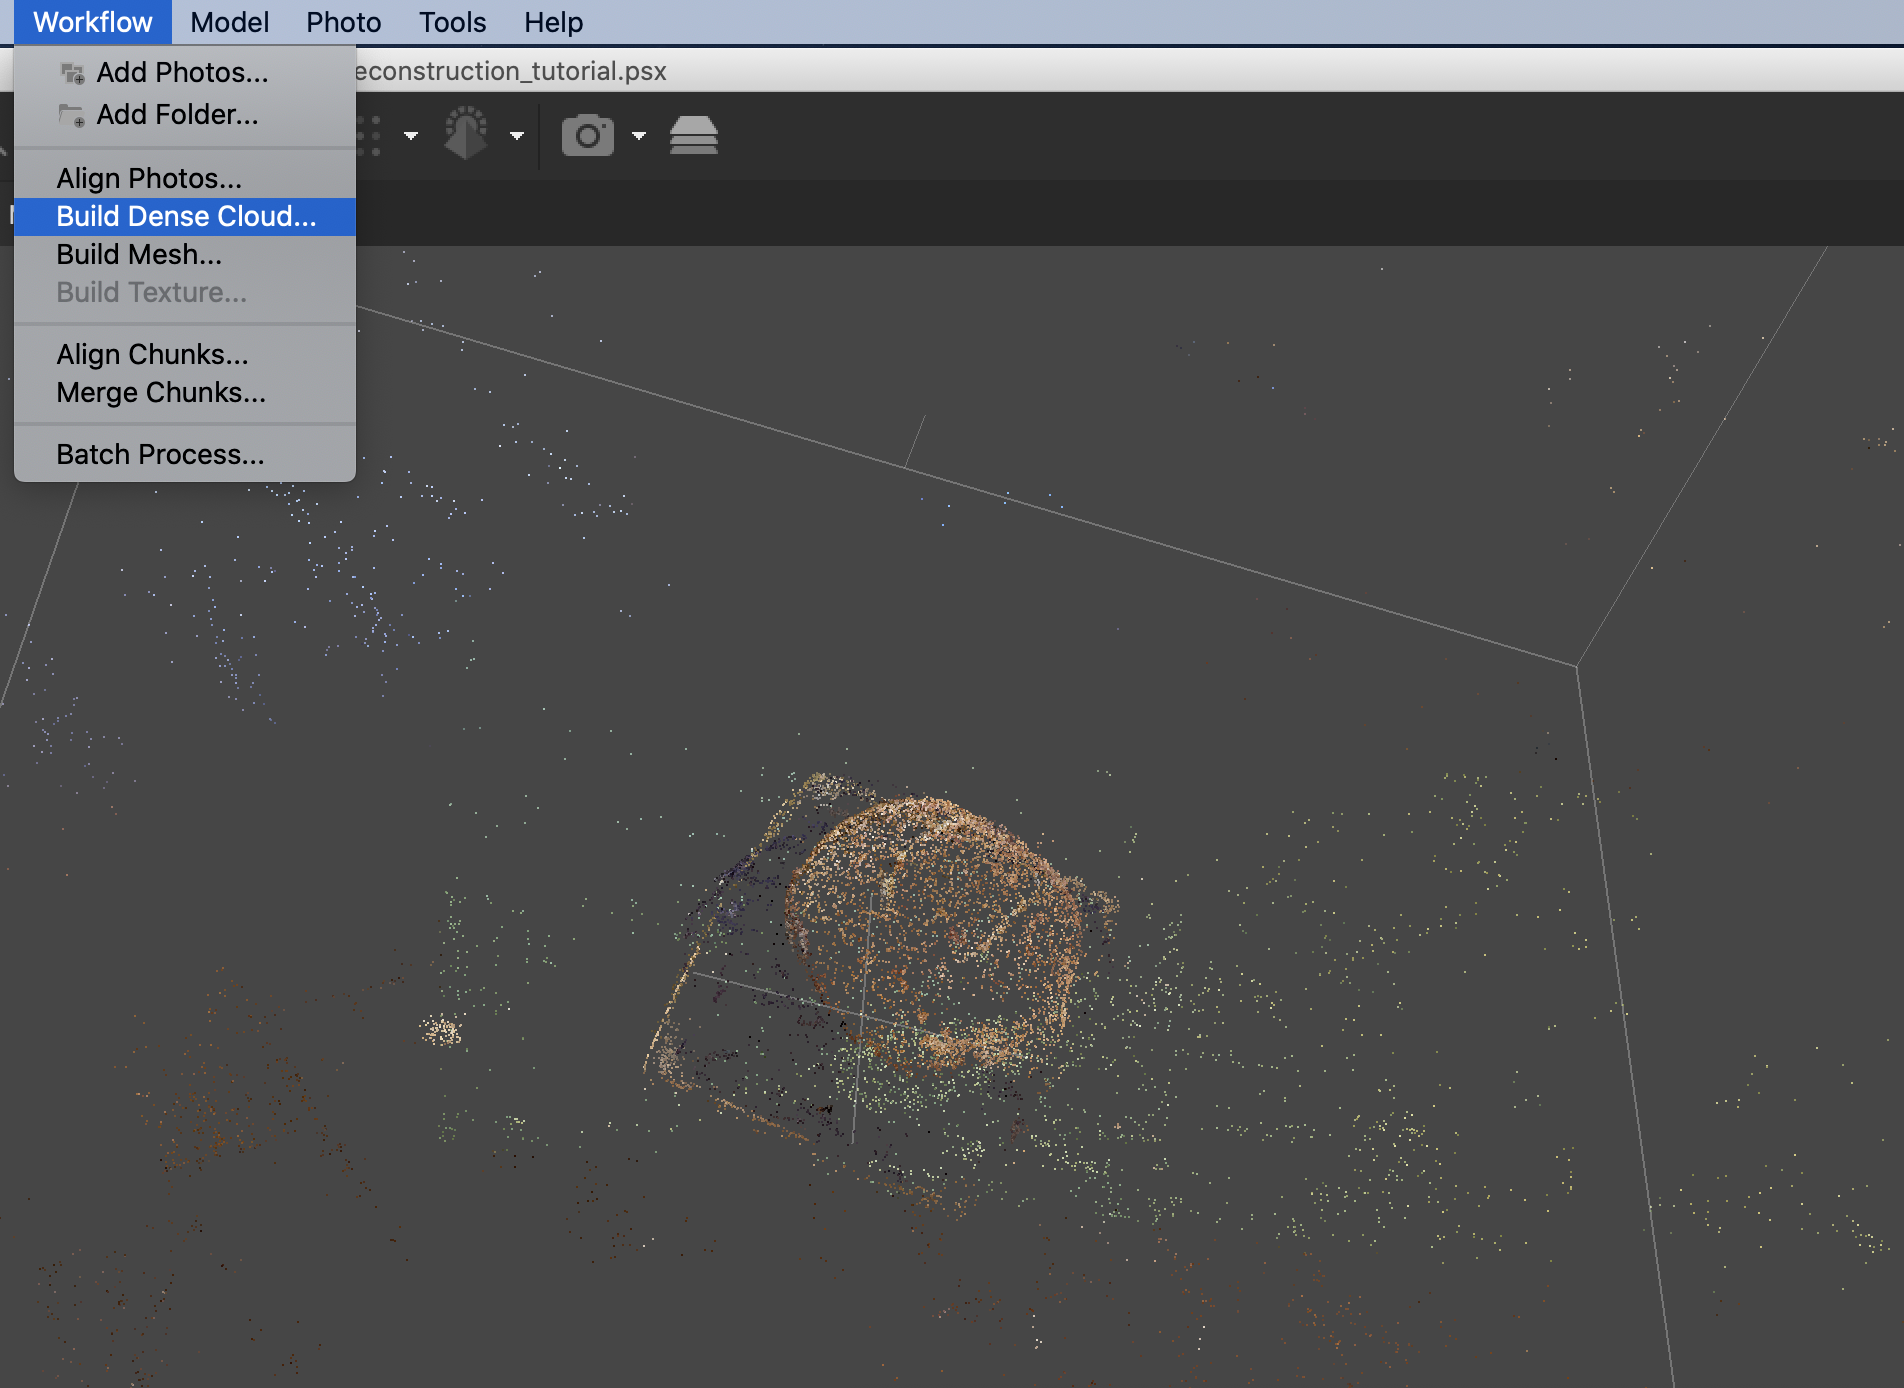
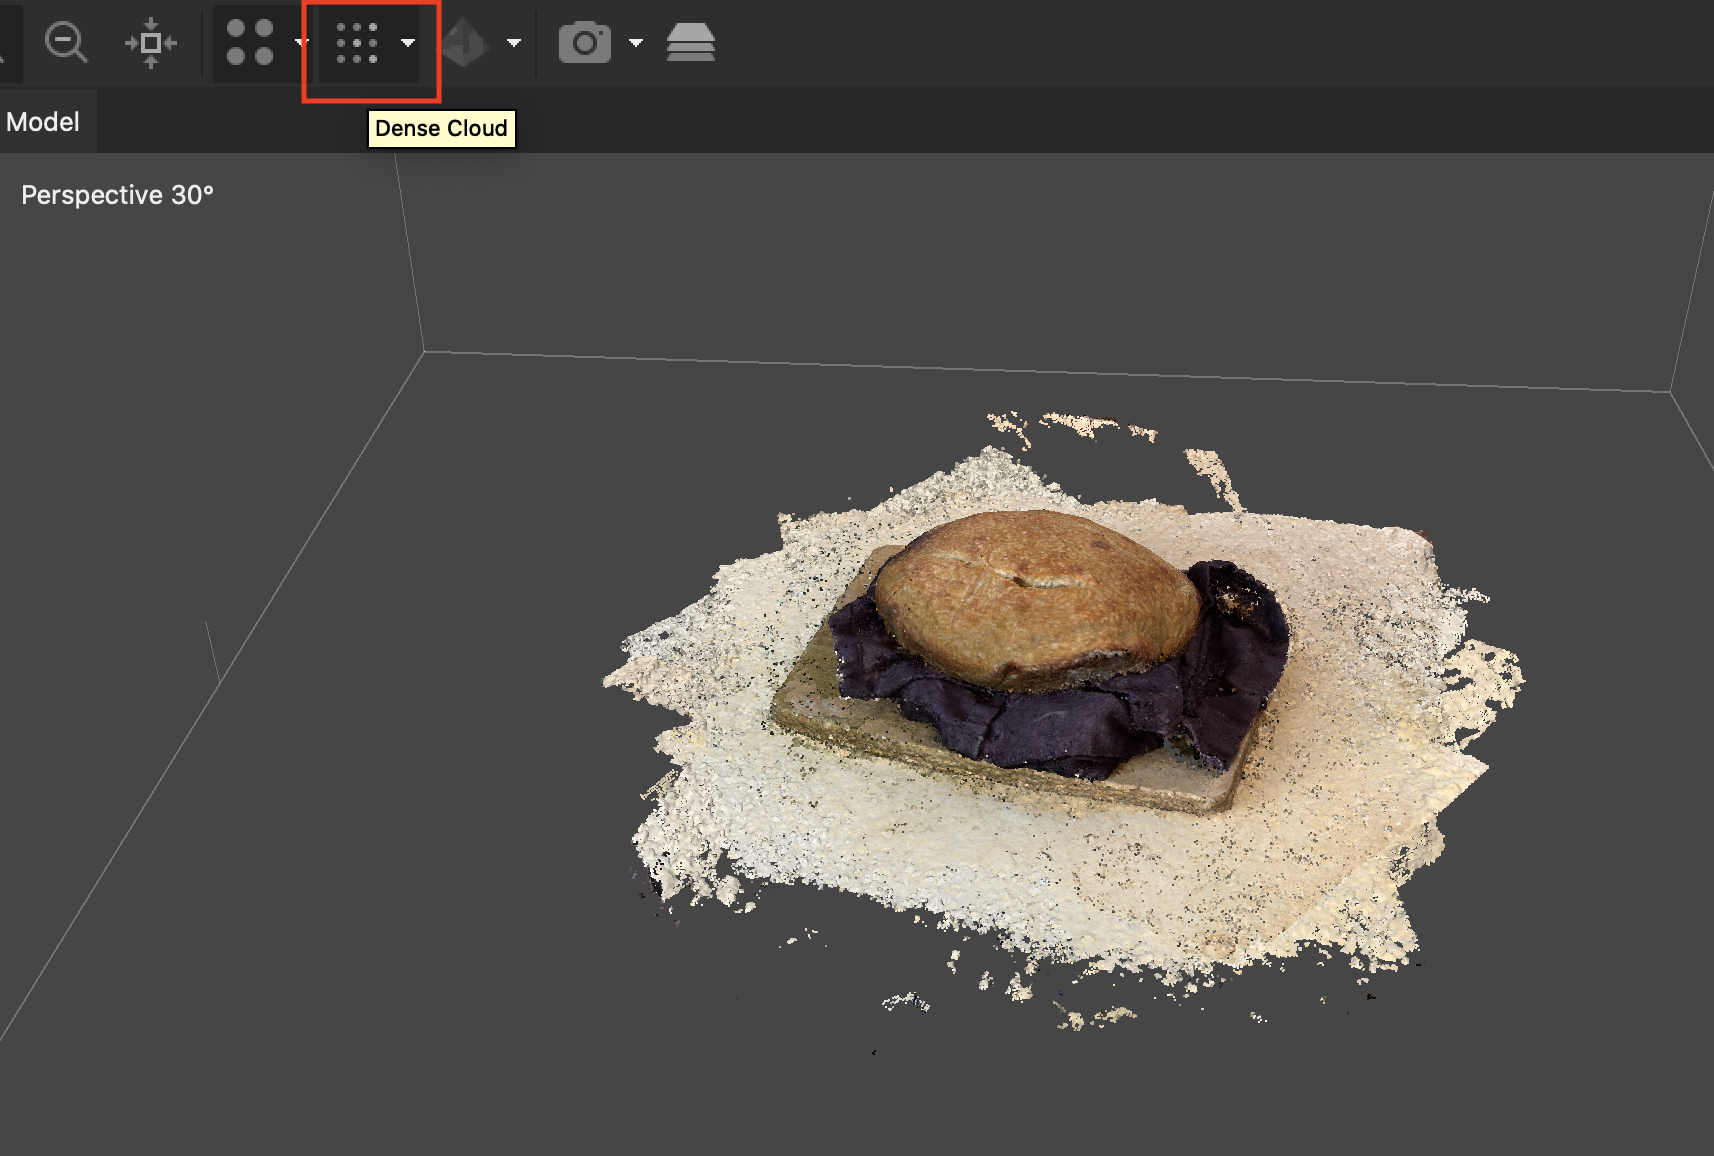
3. Build Dense Cloud
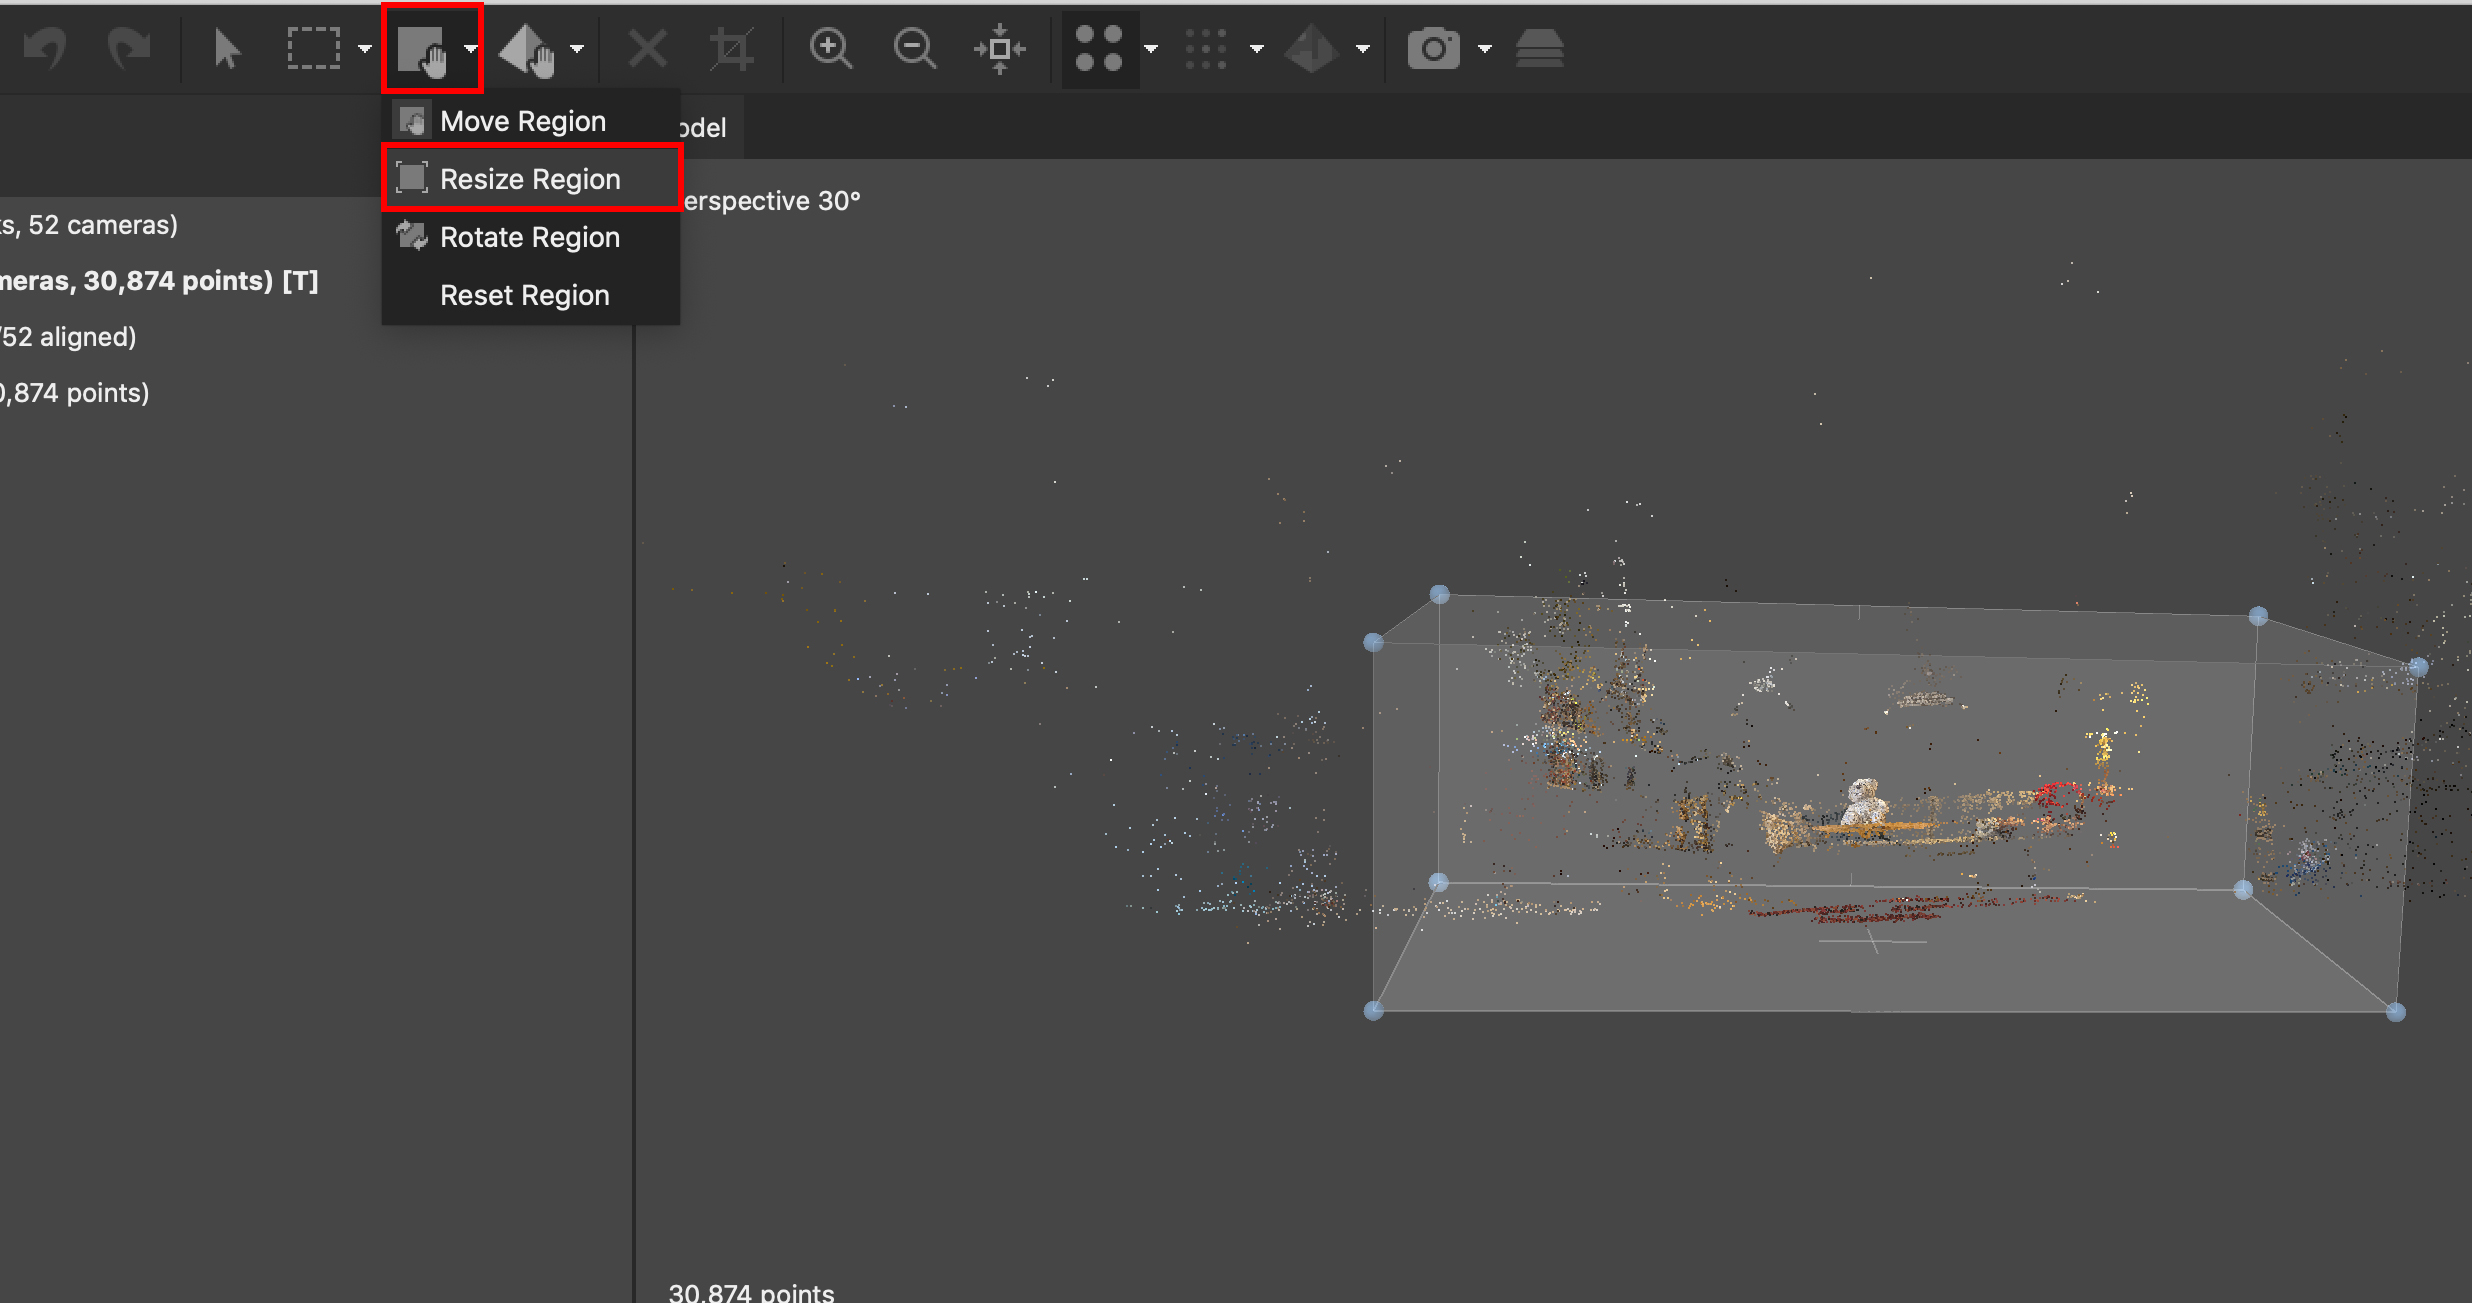
If it looks like the reconstruction is moving in the right direction, we continue to the dense cloud creation. But before we continue - the software has reconstructed anything in the scene it has information about. This could include items in the photographed environment that you are not interested in reconstructing. We should edit our work region in order to minimize the processing time for the next step.
In the top menu region drop down menu select Resize Region. You will see edit points appear in the scene. Modify them to include the minimum are you’d like to process.. It’s okay to cover an area a bit larger than the object at this point. Make sure to change viewing angles in order to avoid cropping important parts of the object. Shortcut to switching views: numbers 1-8 (9 will give you an anaglyph view)
After adjusting our region, we move onto the Dense Cloud reconstruction
Once the process is complete, you might not see any difference at all. Make sure to click the Dense Cloud icon to view the results.
4. Clean Up
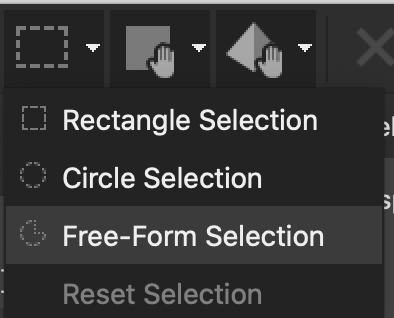
All the points that you now see on screen will go into the next step which is the construction of the mesh and later the exported model. Now is the time to edit out unnecessary points. This process can take some time and can be quite meditative. Use one of the selection tools to select points and click X to delete. You can also select points you want to keep and go to Edit > Invert selection to select the points you wish to delete.

Make sure to save changes to your project. If you are not certain about edits you are making to the point cloud, you can duplicate the chunk to make another version. Right click the chunk and hit Duplicate.
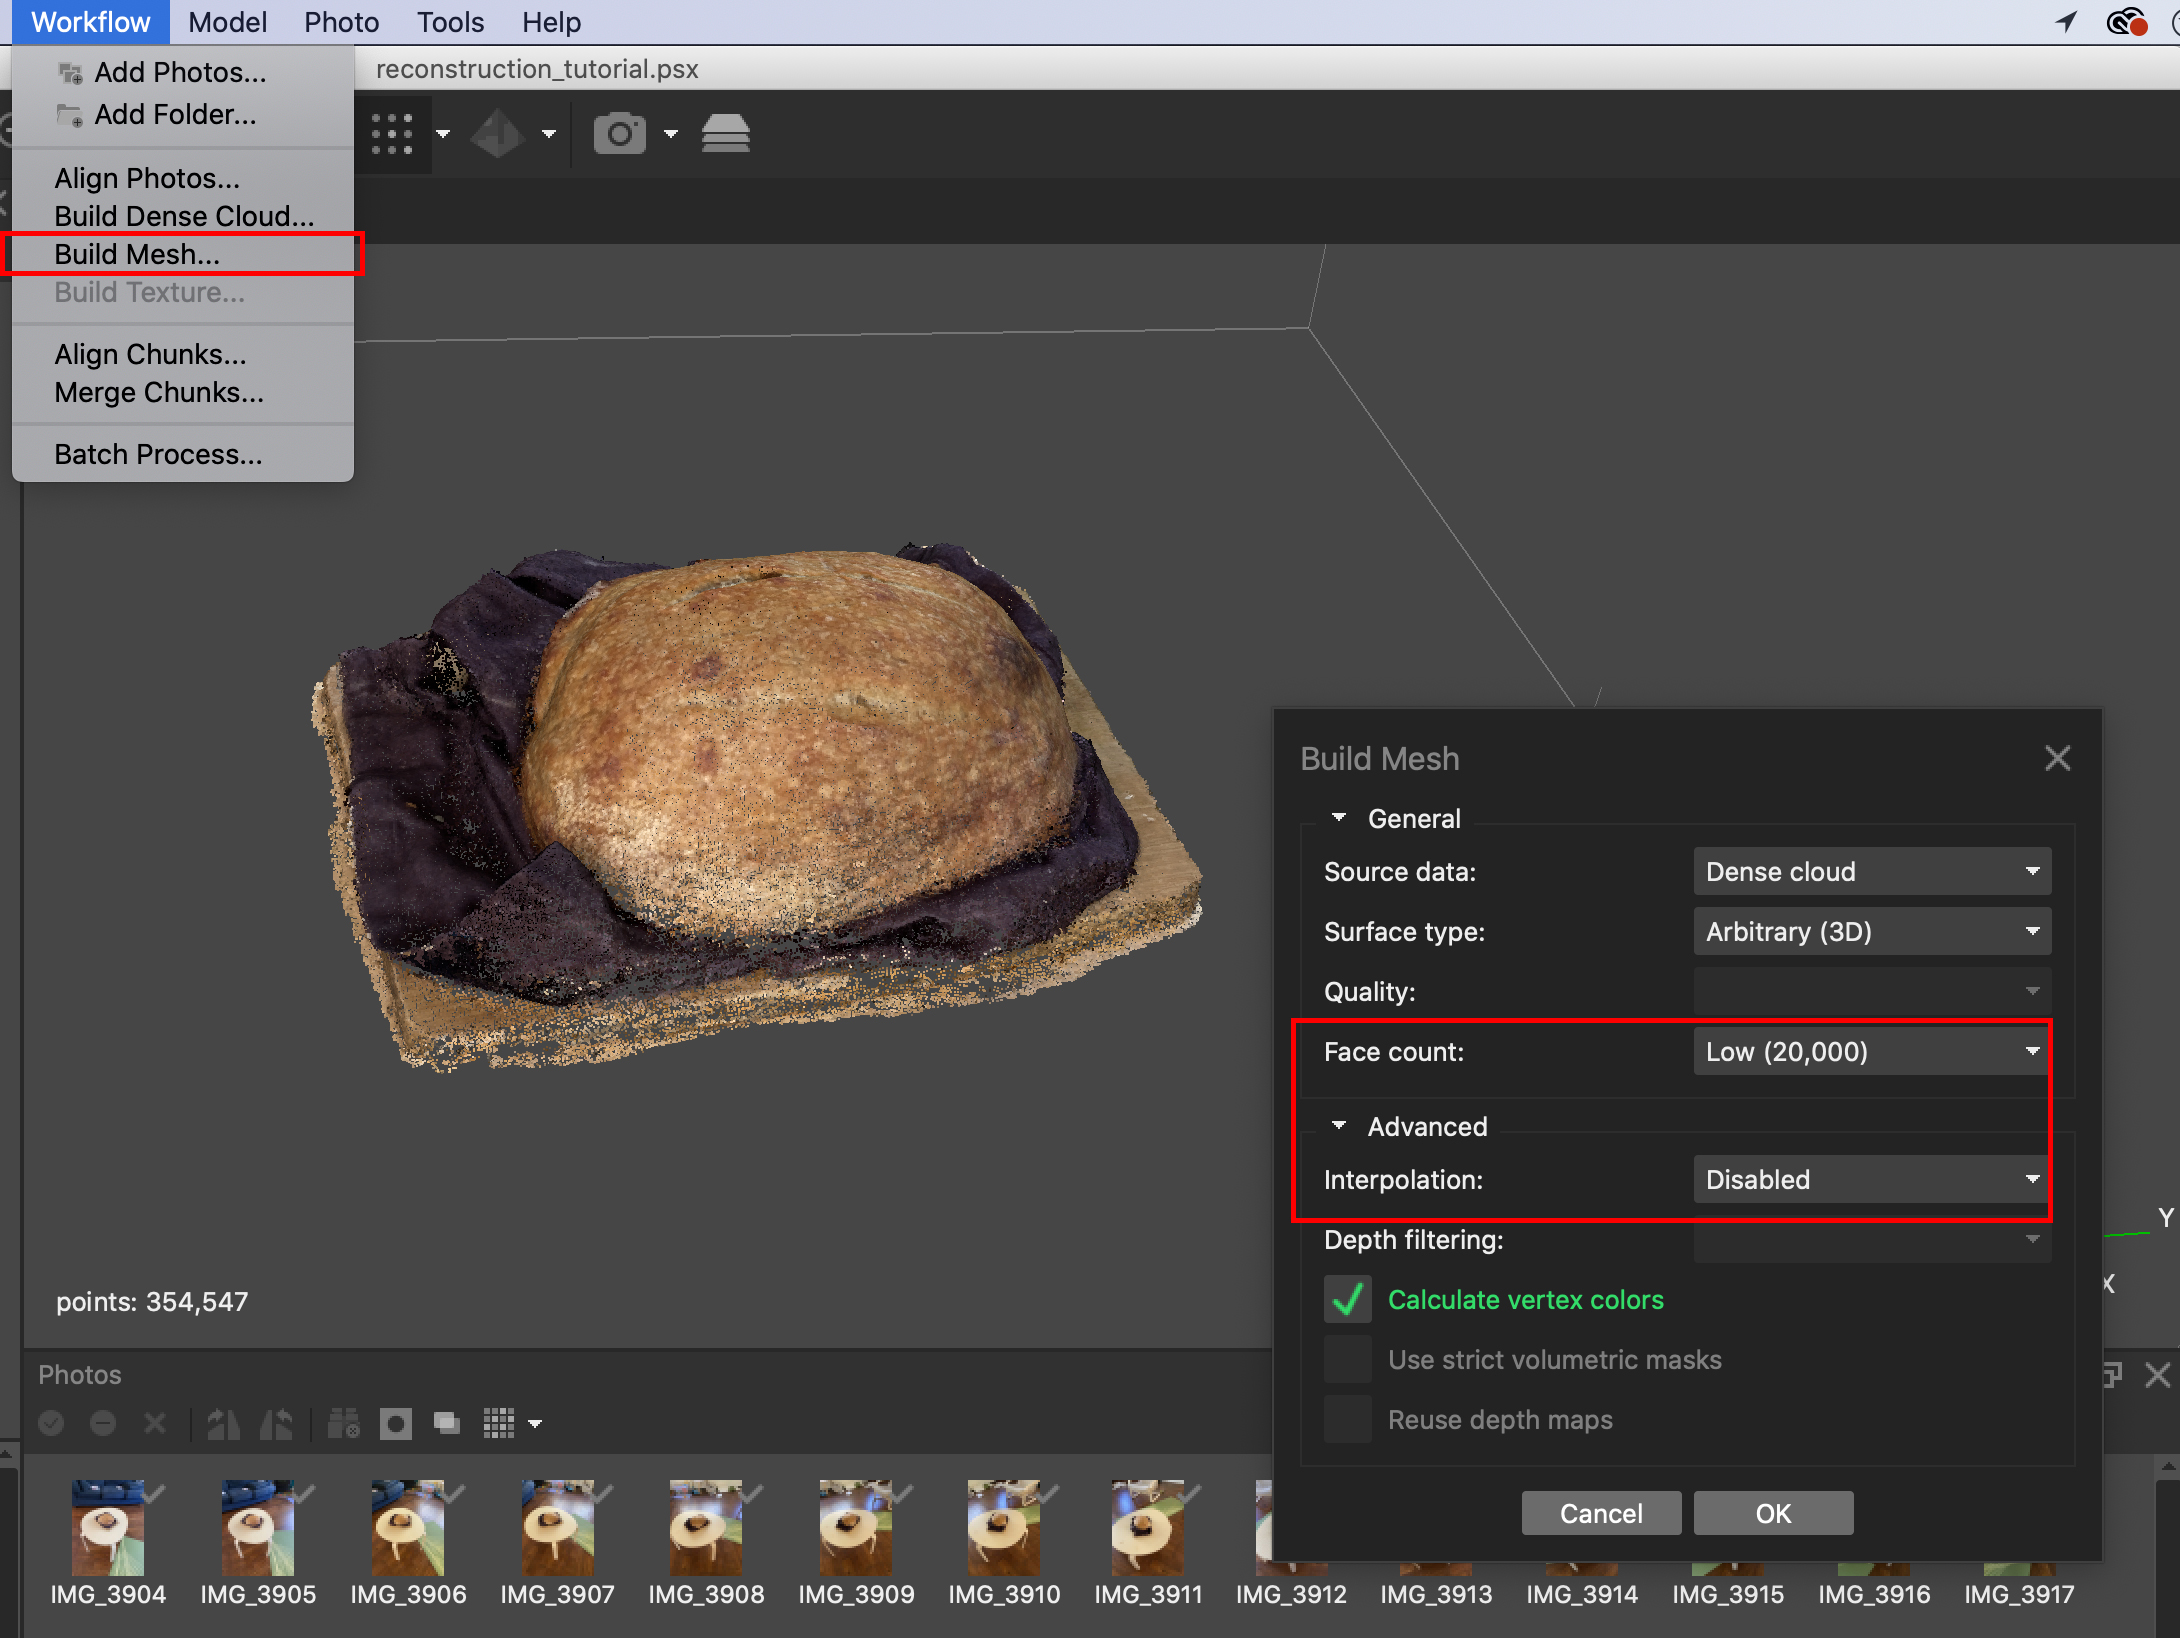
5. Build Mesh
Onto building the mesh, after selecting Workflow -> Build Mesh, modify the options in the pop-up window. Depending on the end goal of your reconstruction, you will want to choose a suitable Face Count. We need our polygon count low for the AR project to run smoothly, so we’ll choose a Low face count. Another approach to this could be to create a mesh with a high polycount and then decimate it. In the Advanced settings of the Build Mesh menu, Interpolation stands for whether holes in the mesh will be sealed in the process and in what way.
6. Build Texture
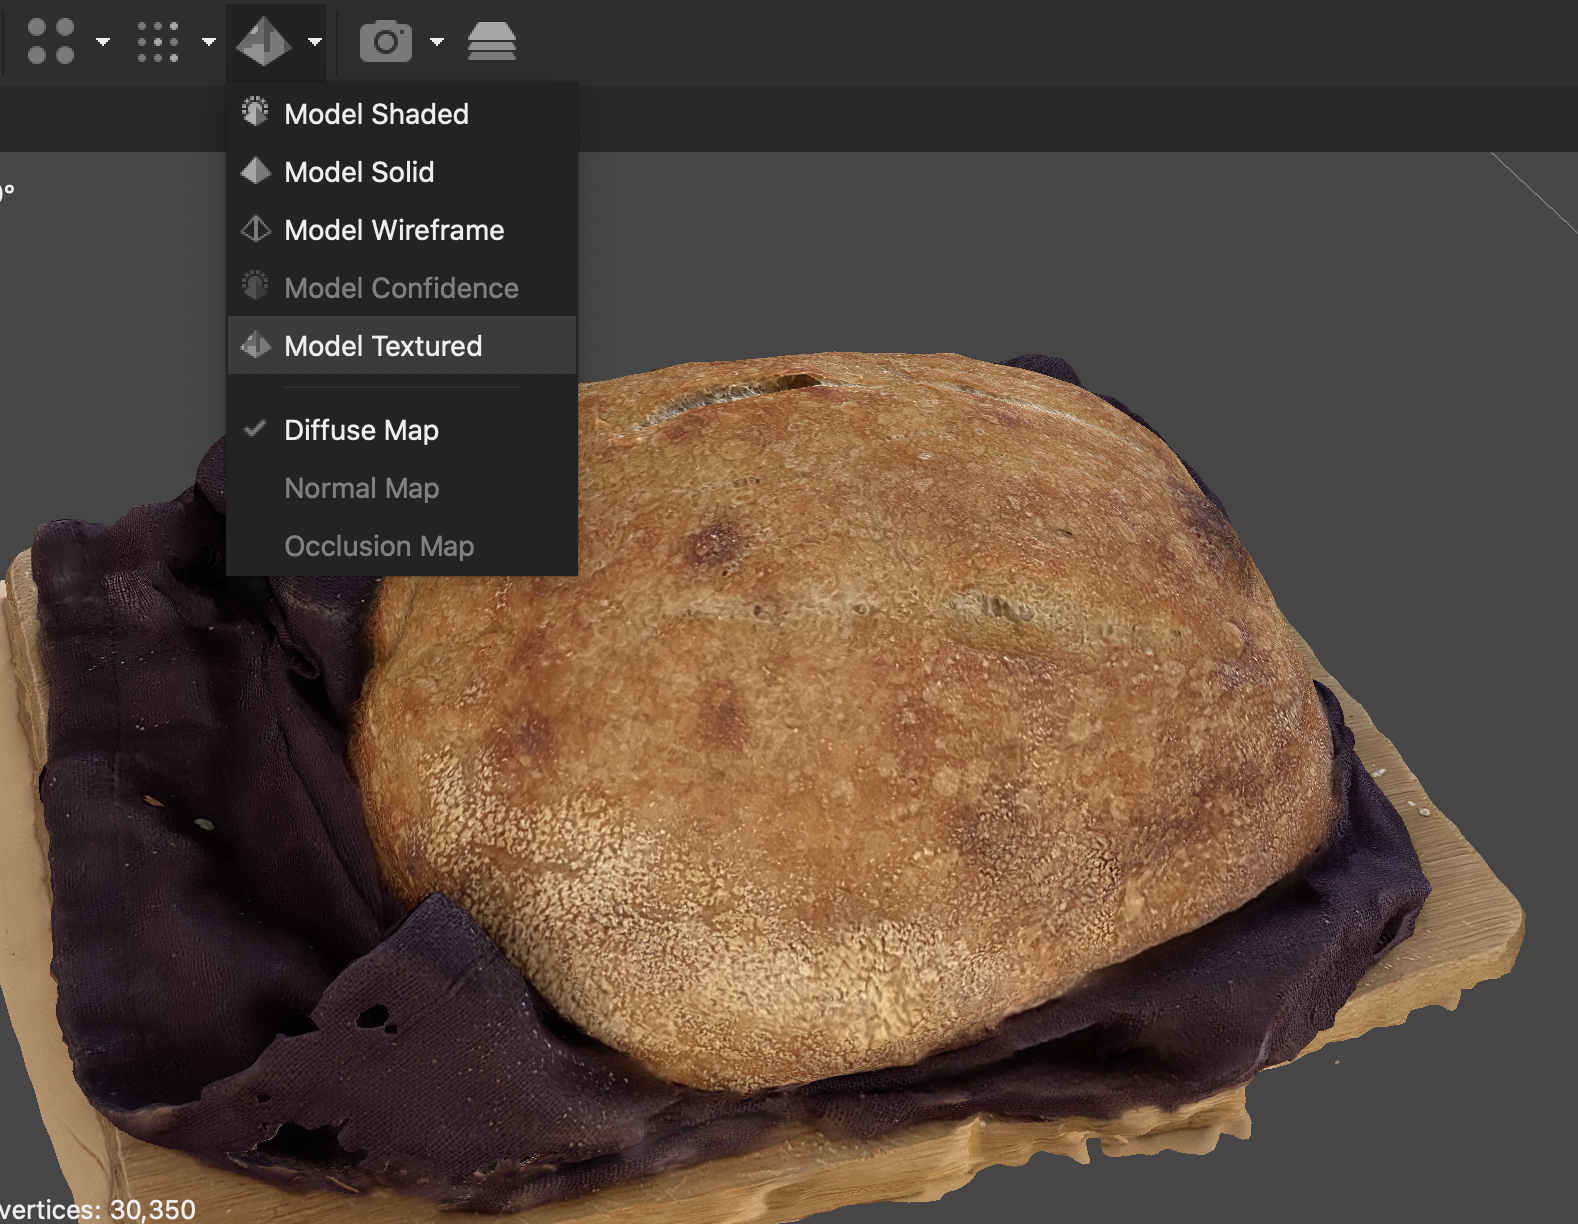
Once our mesh is complete, you’ll need to click the next icon in the row in order to see it. The mesh is going to have color data but it probably will not look that great, especially with a low polycount. Next, we will generate the texture, which will give our object the photorealistic qualities that are a significant benefit of photogrammetry compared with other 3D capture methods.
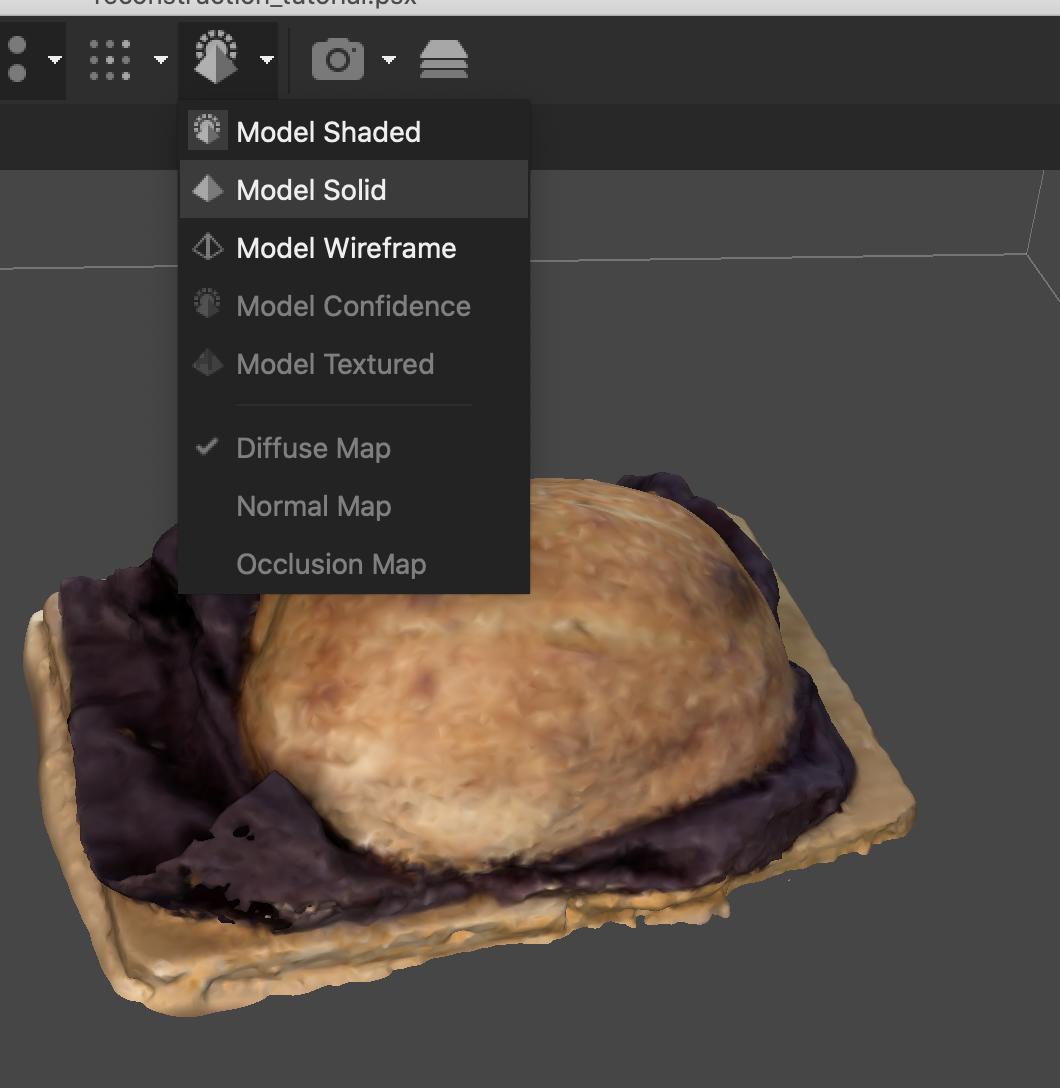
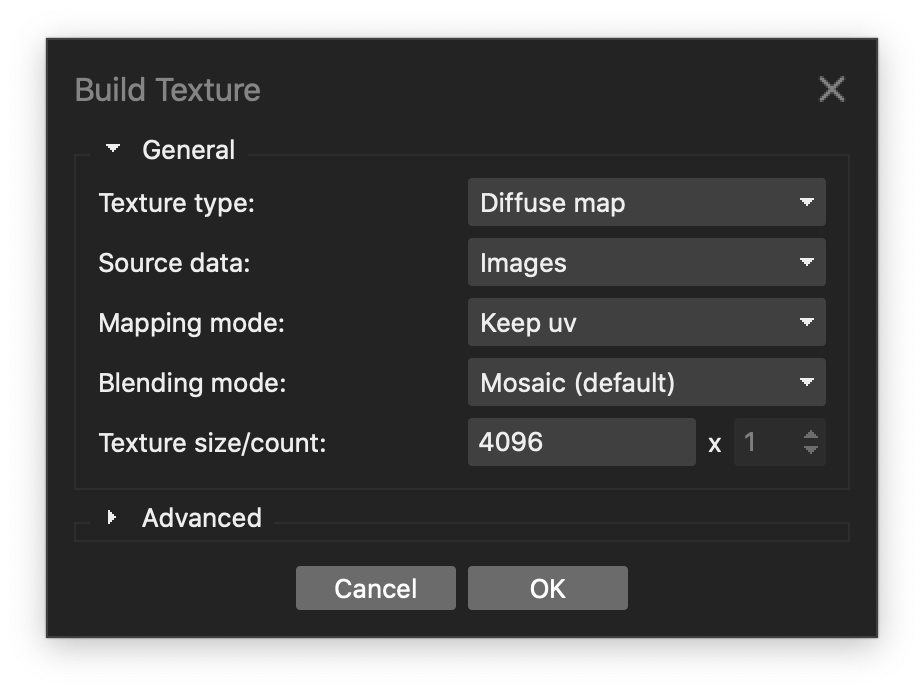
To see the results, select Model Textured from the menu dropdown.
7. Model Export
If you’re happy with the results, we can continue to export the model. You can choose to go back and clean up the model or change settings for previous processes but it’s important to remember the calculations are built on top of each other. Going up the chain to the dense cloud stage, for example, will reverse everything further in the process. If you reprocess a dense cloud, you will then need to reprocess the mesh and texture as well.
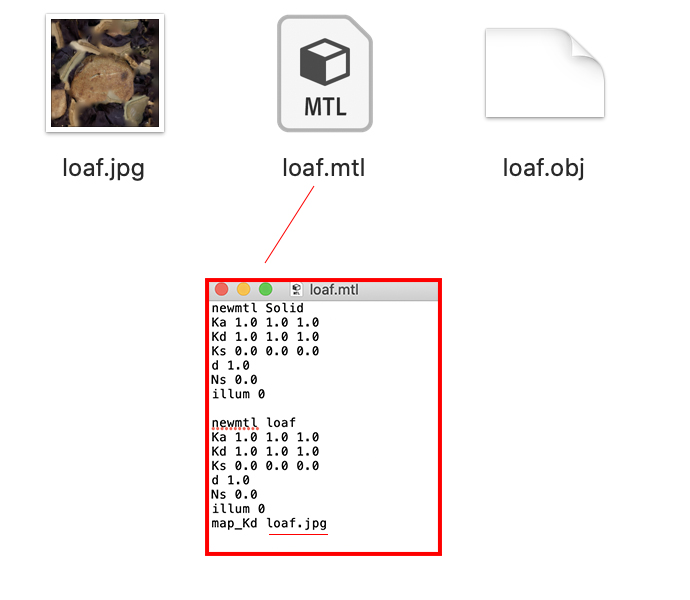
Select File -> Export Model to export our model. You can choose Export Points to export only the point cloud but know that not all 3D software and game engines will render that export. Depending on your target platform and needs, choose the file format to export to. For our tutorial we’ll be using OBJ. Make sure to check the Export Texture checkbox in the Export dialogue.
Once the export is complete, you’ll see that 3 files were created. These files should always be in the same folder. The OBJ file is the geometry, the JPG is the image texture and the MTL file is a text file with material settings for the object and it connects the geometry file to the texture file.. Some software will display the image texture automatically when you open the OBJ and in other software you might need to re-assign the image texture to the material.
To view your export, you can use Adobe Photoshop or a free 3D viewer like MeshLab or Cloud Compare To share your model using Sketchfab. For this webpage we are using Google’s Model Viewer.
Don’t forget to tag us if you capture something with Photogrammetry and post it to social media!